Posts

Showing posts from March, 2023
Image
Hi Crafting Friend, Can you believe its almost time for a new Annual Catalog, and a color refresh to go with it?! That means some new and exciting colors to play with, but to bring in the new we have to let go of the old. Below is a list of the colors that are retiring. (except for Fresh Freesia , it will be added to the Subtles Collection as part of the color refresh)  The Last Chance Product Lists and discounts begin on April 4th. Many items sell out quickly so my advice is to decide what you can't live without and order it on the 4th or ASAP after so you aren't disappointed. Thanks for stopping by, Live Long & Craft On! -Susan 🌄🖖 Click on the links below to get the Last Chance Product Lists 2022-2023 Annual Catalog Last Chance Product List   January-April 2023 Last Chance Product List     

Peaceful Moments Anniversary Card

Image
Hi Crafting Friend, I C.A.S.E.d today's cards from a beautiful sympathy card I found online. I can't remember where I found it or who created it, but I really liked it, so I saved a picture of it. Today when I was looking at pictures and ran across it, I used it as the inspiration to create my anniversary cards. The one in all purples (on the right) is the most similar to the original card that inspired me.  To make a card like this you need a 5.5 square of cardstock, scored at 4.25 and another piece 1.25 X 5.5 along with a piece of window sheet that is 4 X 5.25 for the base of your card. Fold and burnish the score line. Adhere the window sheet to the underside of the flap that is formed, leaving a gap near the score line so it will lay flat when closed and make sure the sides are flush. Adhere the remaining strip of cardstock on top of the window sheet so that it is flush with the bottom and sides of the card. The insert is Basic White cut to 4 X 5.5 and adhered inside. I fuss

Simply Succulents Layered Encouragement Card

Image
 Hi Crafting Friend, I was playing with the Simply Succulents bundle today and came up with this layered card. I started with an Evening Evergreen card base cut to 4 1/4 X 11 and scored at 5 1/2 to make a portrait oriented card. I used the large detail die to die-cut the front of the card and because it was very flimsy, I added a piece of Window Sheet cut to 4 1/8 X 5 3/8 to the back, adhering it around the outside edge.  The DSP is cut to 4 X 6, scored at 5 3/8 and folded to form a tab that is adhered to the inside of the card forming a floating layer in between the front and back of the card (see photo 2)  The tab is covered by a 4 X 5 3/8 Basic White insert . I stamped off once with  Soft Succulent ink  for the inside image of the floral cluster and then stamped the sentiment on top of it with Memento Black. (see photo 4)  I used the leftover piece of 2 X 4 DSP to stamp the succulents with Evening Evergreen ink . I die-cut them and arranged them in a die-cut pot which was stamped

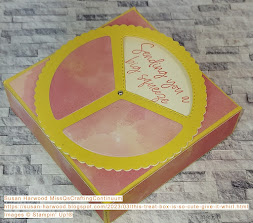
This Treat Box Is So Cute - Give It A Whirl!

Image
 Hi Crafting Friend, Have you ever sat down to create and hit a wall that you can't seem to get around? That's what happened to me when I tried to come up with a cute project for you this week. I knew I wanted to use the Give It A Whirl dies (I've had them for a while, but hadn't yet used them.) I also had the Honeybee Home, Peekaboo Farm, and Sweet Citrus stamps out. I finally conceded defeat to creating an original project and did a search for the Give It a Whirl dies. I found a cute treat box designed by Emma Fawcett . Thank you Emma, for the inspiration! Her project uses Christmas colors and stamps, but the box idea is great for any occasion.  Some of the colors in the  new   Hello Irresistible DSP (Online Exclusives)  made me think of a juicy grapefruit and the dies also made me think of citrus so I designed my treat box using these great colors (Flirty Flamingo & Daffodil Delight) and the  Sweet Citrus stamp set .  I had some retired mini brads that I used,