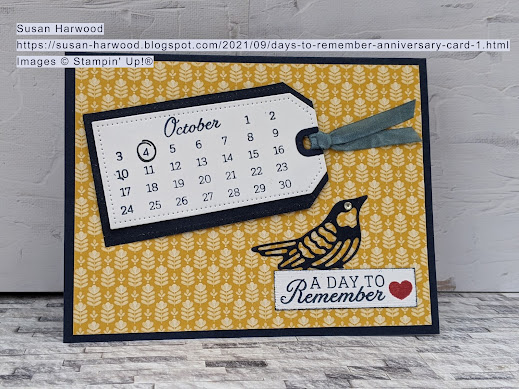
Days to Remember Anniversary Card #1
Hi Stamping Friend,
The Days to Remember stamp set is perfect for any day that you want to commemorate. I have several anniversaries to send cards out for in the next couple of weeks, so that's what I will be featuring. I really like the Bumblebee, Night of Navy and Basic White color combination. What do you think? Let me know in the comments; and if you know someone who would enjoy my blog, please share it with them.
Supplies and instructions for this card are below the photos.
Supplies:
Stamp set: Days to Remember #155026 $17.00
Dies:
Iconic dies #155965 $29.00
Taylor Made Tags #155563 $22.00
Designer Series Paper (aka DSP):
Sweet Symmetry (12 x 12, 12 sheets) #155605 $11.50
Cardstock:
Basic White (8.5 x 11, 40 sheets) #159276 $9.75
Night of Navy (8.5 x 11, 24 sheets) #100867 $8.75
Inks:
Night of Navy Classic Stampin' Pad #147110 $7.50
Real Red Classic Stampin' Pad #147084 $7.50
Tuxedo Black Memento #132708 $6.00
Markers:
Misty Moonlight Stampin' Blends (set of 2, Light & Dark) #153108 $9.00
Embellishments:
Crinkled Seam Binding Ribbon #151326 $7.50
Rhinestone Basic Jewels #144220 $5.00
Adhesives:
Multipurpose Liquid Glue #110755 $4.00
Stampin' Dimensionals #104430 $4.00
Other:
Mini Stampin' Cut & Emboss Machine #150673 $60.00
Instructions:
Night of Navy cardstock - 8 1/2 x 5 1/2, scored at 4 1/4 on the long side for the card base.
2 1/4 x 4 3/4 to die-cut the reinforcers & the backing tag using the largest tag die and the Mini Stampin' Cut & Emboss Machine. (I cut 3/8 off the flat end of the tag afterward so the border would be smaller)
2 x 1 1/2 to die-cut the Iconic bird using the Mini Stampin' Cut & Emboss Machine.
DSP: Bumblebee "wheat" print - 4 x 5 1/4 for the card front and 4 x 3/4 strip for inside the card.
Basic White cardstock - 4 x 4 1/2 for inside the card.
2 1/8 x 4 1/4 to die-cut the tag using the 2nd largest die and the Mini Stampin' Cut & Emboss Machine. 5/8 x 2 1/8 strip for the sentiment which is stamped in Night of Navy and Real Red, then edged with Night of Navy.
To assemble the card:
Fold the card base on the score-line. Adhere the Basic White and the Bumblebee DSP strip butted against one another inside the card with Multipurpose Liquid Glue, leaving a 1/8 inch border all around.
Adhere the DSP layer to the card front with Multipurpose Liquid Glue, leaving a 1/8 inch border all around.
Stamp your calendar on the white tag with Night of Navy and the circle on the date with Memento.
Adhere the reinforcer to the white tag with Multipurpose Liquid Glue, lining up the holes. Adhere the white tag on top of the navy tag using Multipurpose Liquid Glue, again lining up the holes.
Cut a 6 inch piece of Crinkled Seam Binding Ribbon and color it blue with the Dark Misty Moonlight Stampin' Blends marker, then fold it in half & pass the fold through the hole in the tag from front to back. When its about halfway through, open the fold and pass the cut ends through then gently pull each cut end, one at a time to snug it up.
Adhere the tag to the card front with Dimensionals.
Adhere the bird die-cut and the sentiment using Multipurpose Liquid Glue. Add a Rhinestone Basic Jewel for the bird's eye and your card is complete.
I hope you enjoyed this week's project. Have a lovely day!
Susan 🌄🖖


.jpg)
.jpg)
.jpg)
Comments
Post a Comment